
Monday, June 18, 2012
Card Makers Offer
Stampin' Up Special!!
 With any purchase over $50.00 from my Stampin' Up website (see side bar) I will send you 25 card bases and matching envelopes! With $100.00 purchase I will send you a set of 50! My gift to you at no additional cost! ~Ginny I just inserted this commercial, the product review is the below post!! :)
Ever wonder how....
Ever wonder how you can safely clean your self healing cutting mats? Three Years ago my Husband purchased two giant cutting mats for my cutting table, they are a great yellow color and have traveled through all stages of my studio morphing. I have used them for all of my sewing/quilting/ crafting work and after three years they were a real mess. I have cleaned them as recommended by the manufacturer and that helped but nothing took off the stazon inks, glimmer mists stains and other various dirt and ink stains. I do try to be very careful and neat with my stuff, one of my however, cats just does not get staying off my ink pads!! I actually like the prints wandering off the mat, but the rest just looked dirty. Earlier in the week I tried my Stampin Up adhesive remover to take of old glue bits and that worked great! Nothing else got those glue off and I tried everything! This looks just like one of those erasers we used to use in art class back in the 70's.


This is just a simple 2x2x.5 rubber piece, I think it sell for 2.95, but it not only takes the adhesives of my mats, more importantly it takes glops and some of those bits of glue that squish out between the layers of my cards!!

Here is a couple of before pictures of my mats:

They really look pretty crappy, especially since I have about 25 square feet of them on my workbench tops!
This is an after:

I know these pictures aren't very good, but I think you can get an idea of how much they are improved! To help keep the mats in good shape I wiped them with a thin coat of glycerin and water. they felt smooth as new! This is the great product I used to clean them with: Home Depot, $4.99 and I only used on eraser out of the package of 7! I thought of this only because I used to use these to clean my vintage sewing machines, you wet the sponge, squeeze out excess water and just rub on the area you wish to clean. They never damaged the old paint job, just remvoed nicotine, grime and grease. I also tried it on my burnerless stove, andf that helped with a few spots I was having a hard time removing.

So all in all for less than a dollar I was able to clean and restore the mats I paid about 80.00 for. I think that is a good deal!

This is the culprit that likes to walk through the open ink pads!
Thanks for stopping by! Next: samples for my SU work shops!
Tuesday, June 12, 2012
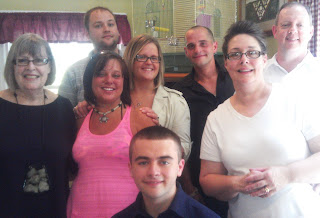
Almost a week since my last post, My Stampin' up demonstrator kit came in, my sister from OR came in, my Son and Fiance from WA came in, my new living room set didn't come in but is in the town next door (tomorrow, I hope, delivery). My sister in CT had a great 85th birthday party for my mother and almost all of the family was there! In between, cleaning and cooking and sewing fuel pod covers, We've had a great time! Here is a pic of my family: my Mom, Son Roy, Megan, Son in law Brian, Wonderful Husband Steve, Me, Daughter Lissa and Son Steve.
 I did a dry emboss on the background panel and use gold and then a layer of black pigment inks to give it a patina look. The chair and chandelier were in black heat embossing, I colored the chair with Stampin' up marker.
While the kids are out with friends, The Steve's are studying and I am working on getting things together for a Stampin up workshop. I did this about 15 years ago and a lot of things have changed, and a lot of things haven't! One thing that has not changed is the Quality of their products. Back in the late 90's they were a new company and new to direct marketing sales, their ideas and products have stood the test of time! Now there are many more benefits to becoming even just a causal demonstrator/ hobby stamper! Like 20% off everything! Or 20%+ income if you want to make it a business! Their website and support is just plain phenomenal! While I am plugging them, I am not trying to, I am just happy with the products and the business. I don't know about you, but I get tired of making purchases and not being happy with them. One Really great thing Stampin' up has done, is change their ink pad for their beautiful dye based inks! Personally I couldn't be happier with them. I can for-see a glut of the old style pads on ebay! More good news is that only 6 ink colors had to be reformulated for the new pads. So that means you can still use your older reinkers on the new pad! Somehow this new pad holds more ink and allows more ink to sit on the surface of your stamp, so you get a much better image with the first stamp!! Can you imaging no more duds?? Now more coloring in an area that wasn't inked enough?
 This picture doesn't do the product justice, but you can see the pad is a very smooth surfaced dense foam. the pink stamp was inked with the old ink pad and there is a big fade spot on it. If I had stamped that on a card, I would have tossed it. The second in the new gumball green color is from the new pad, a very light tap, x3 and the stamp was inked and the stamped image prefect. Really makes me want to just purchase the whole lot of colors!!

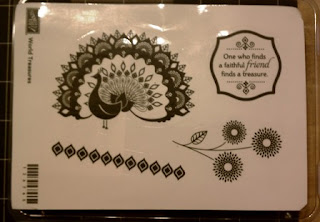
Some of my new products fresh out of the box! Stampin up let you pick the items you want for your start up kit! Which of course it makes it easier to teach when you are using colors and images you love!! I am not into "cute" and if I had to demo cute all the time, well I just couldn't!

I haven't had much time in my stamp room this week, but I did make this card for my mom

While the kids are out with friends, The Steve's are studying and I am working on getting things together for a Stampin up workshop. I did this about 15 years ago and a lot of things have changed, and a lot of things haven't! One thing that has not changed is the Quality of their products. Back in the late 90's they were a new company and new to direct marketing sales, their ideas and products have stood the test of time! Now there are many more benefits to becoming even just a causal demonstrator/ hobby stamper! Like 20% off everything! Or 20%+ income if you want to make it a business! Their website and support is just plain phenomenal! While I am plugging them, I am not trying to, I am just happy with the products and the business. I don't know about you, but I get tired of making purchases and not being happy with them. One Really great thing Stampin' up has done, is change their ink pad for their beautiful dye based inks! Personally I couldn't be happier with them. I can for-see a glut of the old style pads on ebay! More good news is that only 6 ink colors had to be reformulated for the new pads. So that means you can still use your older reinkers on the new pad! Somehow this new pad holds more ink and allows more ink to sit on the surface of your stamp, so you get a much better image with the first stamp!! Can you imaging no more duds?? Now more coloring in an area that wasn't inked enough?


Some of my new products fresh out of the box! Stampin up let you pick the items you want for your start up kit! Which of course it makes it easier to teach when you are using colors and images you love!! I am not into "cute" and if I had to demo cute all the time, well I just couldn't!
 |
Here I am working on Door prizes and workshop gifts. I have been stamping for 35+ years, right back to high school days where I cut my own stamps from erasers and linoleum tiles! One thing I do know is that this is a hobby that takes a while to build up supplies, when you have lots of "stuff" then you have lots of freedom to create. So as a demonstrator when I am teaching a workshop, I am very aware of the new stamper who wants to create and is not sure where to begin on the creative side or where and what to start purchasing. It can be a little overwhelming, especially when a Newbie places an order, receives it and then thinks, why did I buy this? I can't remember what she said on how do do, and since I only had 30.00 to spend, I now have a set of stamps and a punch that looked great, but I can't even make a card. I have seen it happen so many times with friends that get caught up in the fun of a workshop. So I offer a lot of freebies and incentives, to help especially the new stamper. I also have a written guide on how to purchase, to get the most for your money while you are building your supplies and building your skills. I think one thing that is really important when you are creating anything is a sense of accomplishment! When I do a workshop I really want everyone to leave feeling like they had fun and actually made something that was nice!
Thanks for stopping by!
Wednesday, June 6, 2012
Cards with The Word, for OWH

My Friend Janet and I went to a Christian Womens Conference a month ago.

We stayed up till 3:30 am making these cards. We made about 80 all together! Good Time, Good Cause, Good Friend and Good Word!

How to Cut a reem of paper perfectly and fast!

I am the Goldielocks of paper cutters. Not that I want to be, I just am. When I was in 4th grade, way back in the 60's, I was put in charge of cutting the paper for my class. Using a guillotine cutter, I managed with very little help to cut everything from Manila art paper to the beautiful white lined paper for our English class. I loved it, the paper, the cutting, the glory and the fame of it all. I think I wore a crown when I was on duty. So that is when it started. Since then, having worked in my fathers printing business and my own dabbles in paper works I have cuts tons of paper! More recently I began selling paper and needing to cut into the preferred sizes used by card makers. So while I had 4 very good cutters including the Genesis Trimmer, not one of them cut through a hundred sheets of 90# card stock in one swoop! So I went on the hunt. I looked at "stack cutters" on web sites, watched videos, talked to my printer friend and checked with other paper arts people. The printers solution was a 1800.00 dollar machine( I did use my inhaler with that suggestion) and my friends hadn't heard this type of cutter. So I went over to ebay to see what they had, and they had a lot! I read about 50 'feedbacks' and watched the auctions. I did a buy it now from the seller ep320, received instant communication and a tracking number. (Now I have no affiliation with this seller and I am not receiving any kick back, nor am I trying to advertise. I just want to pass on information about a product I am very happy with!) So within the week I received the cutter, packed very nicely and weighing in about 30 lbs!! My husband opened the box and assembled what needed to be assembled and I think he said that took about 5 minutes.
 Here is a photo of it on my work bench. This is the model which handles 12" or less sized paper. The machine itself is about 14x20 and 8"high not including the lever you see. The surface is a beautiful black shiny enamel. The green thing is to keep the paper stack straight and lined up and it stays put because there are magnets on the under side. The machine is all metal.
  The stack of paper is lined up using the grid on the surface and then slide under the blade housing. you can see the red blade stop in the picture above. In the picture to the right you notice the round hand crank, by turning this crank you lift or bring down the press which will hold the paper stack in place. one that is secured, you simply bring down the large lever and the blade will slice through the paper like butter!
 In this view you can see the blade down.
 Here I have about 75 sheets of 130# Chipboard. The specs say you can cut 400 sheet of 20# paper. I haven't tried to but it doesn't look to me that 400 sheet would fit in the blade housing, I would say 250 no problem. Here however I have quite a lot of chip board. I was able to slide it into the blade house, lock down the press, with ONE pull on the handle I was able to make a perfect Cut!
There was only two cons, and much of that was me, but I will share my blunder. The lower base of the grid is in inches and the upper part of the grid is marked off in metric. Which is fine except I didn't realized this affected how straight the cut would come out. about 100 sheets of card stock later I realized I was eyeballing the two grids and using the green thing to line up the paper with the off measurement! The Second con is, the crank handle is made of plastic and I am afraid it is going to snap. I tend to baby it. I highly recommend this machine for cutting larger projects, I cut in 5 minutes what had been taking me an hours to cut. I cut as few as 5 sheets and they cut just as well, I won't use this machine for anything under 8 sheets. It is very heavy duty for the home studio, sturdy and easily put together. The communication from the seller was great. the price: an out standing $ 89.00 Shipping was reasonable too. I am going to list the link for the auction, that way you can check ep320's other listing. Check it out
Later on I will tell you about a fabulous adhesive I ran across that is wonderful and Cheap!!
Thanks for stopping by!
Ginny
Tuesday, June 5, 2012
What I've been doing for the last 4 months!

I've also been busy with Operation Write Home which I love being apart of . I also made another Change in my routine, I decided to go back to work for the Stampin' Up Company!!! I did this about 15 years ago and really enjoyed it, and thought now would be a good time to start up again! My Wonderful Husband has also been working a great deal in the last few months, and is fully supportive of my endeavors. Without him there is now way I could do all this! He helps me all the time and I really appreciate it.

Tomorrow I will be posting a product review of a terrific stack paper cutter, and in future postings I will have lots of OWH and Stampin Up cards, thoughts and crafty fun.
Subscribe to:
Posts (Atom)
Scripture Writing Set up for the Week
I have been following a daily scripture writing program for four years now, the more I do this the more I love it! It is one small process t...

-
 I recently watched a You Tube video on how to make an origami Paper dress, I thought these would make the sweetest card for all occasions! ...
 -
 Here is a fun tried and true old fashioned card making technique. Long before we had all these sumptuous patterned papers we had gorgeous n...