Friday, August 23, 2019

My First EGA class: From Fail to Fun

In my last post I mentioned my joining the EGA and my first class; a Blackwork Pumpkin.  Today I am going to show you the results.
Embroidery is a generic term for a great many styles/types of needle work - I love it all but I don't want to stitch it all.   This class has clarified in my embroidery portfolio, I will never be accomplished at doing counted work.  Math is not my best friend, I only like it in small necessary doses. Counted Work ( Blackwork being part of that) requires counting and compensation, recounting and more compensation and I am not even going to try to explain that here - I am just a total flop at it.

I discovered with my pumpkin class once I got beyond the pumpkin out line I became totally lost in the counting and the compensation part.  I really have a new appreciation for my fellow stitchers who excel at this.  I love it, but not for me.

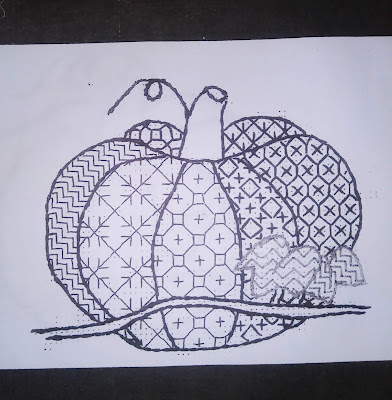
This is the pattern I traced you can see the stitches - along with the tracing parts, there are details stitch instructions which included measurements and pictures - which were of no help to me whatsoever - my bad - the pattern was fine


I decided right off I wasn't going to do the pumpkin in the traditional black - what would I do with it after?  Who wants a black pumpkin on bright white fabric.  That should have been my first clue.  I feel like If I am going to spend precious time on something, it needs to do something other than sit in a drawer.

Those of you who do this, no doubt can look at this and see this is not for me.  This took me three hours!  I thought about ripping it out (again) and starting over (again) and then I started thinking about some of the pretty orange fabric in my scrap basket and how nice this would look as an applique'd piece, on black fabric, with beads, with gold thread.  And that was the end of my Blackwork career

I retraced the pumpkin parts cut out fabric bits, pulled out fibers and this is the result:


I had so much fun doing this I think I will do a motif for each season  and frame it .  Next I think will be pine cones and boughs.

Shakespeare's Polonius said    "To thine own self be true"  and that is good advice, however there can be a lot of fun in trying new things in the process of developing that self.  So now I know I will never be that precise type of stitcher and will love and appreciate the skill and talent from afar, while I am ankle deep in beads.

Thanks for stopping by and I hope you have a great day!
Ginny M
Monday, August 5, 2019

Local EGA First Meeting of the Year and Loving Your Neighbor as Yourself.

The Mohawk Valley Chapter of the EGA had it first meeting of the 2019-2020 year, I felt so privileged to be there as a member.  Joining a local EGA (Embroiders Guild of America) has been something I have wanted to do for decades.  Either there wasn't a local chapter or I did not have the time to join - Now there is a local and I can sandwich the meetings into my day.  I am very thankful for this time in my life that I can do these kinds of things - I used to say "Someday". Today is that someday and it is such a pleasure to go and find new friends with like interests. 

Today I received gifts as a new member and was able to take a class. Enjoy coffee and listen to a short lecture.

A sweet Newbie gift, I picked the yellow one.


Take s class on a new to me style of needle work : it may look easy - it isn't!

Pick up a few goodies at the "White Elephant Table"


I midnight project to get my name tag made:

We are commanded to love our neighbor as yourself - I am working on taking better care of myself so that I CAN love my neighbor.  Needle work has been something I have loved since I was 11, it is a relaxing past time and helps me fill my home with "all manner of beautiful things".  It brings me a sense of accomplishment in a loved form of artistry. 
I think if you are reading my blog you to are a crafter - I hope you can find time to pursue some of your passions just for the sheer enjoyment of it -love yourself!
Thanks for stopping by and go express yourself!
Ginny M


Monday, July 15, 2019

My Little Needle Book and Sewing Machine Service Manuals

I've been working on a needle book swap for the last two months and have finally finished.  It's going in the mail to day.   I haven't been blogging much about this or anything else lately, I've had a wonderful summer of family and friends here and I'm learning to pace myself better. I'm learning at almost 60 to take better care of myself and I am relaxing (somehow) more.  I decided I was just one of the best at self induced stress.  Picking up the needle and hoop definitely slows me down, gets my feet up and helps me to enjoy the many, many blessings in my life. 

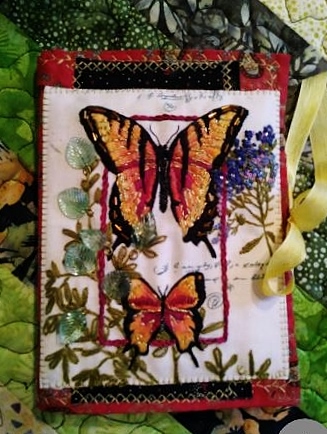
Here is the book:
This was supposed to be a crazy quilt needle book and somehow, it just developed a life of it's own and turned into surface embroidery 

Here is a picture a little less blurry.
A little thread painting and beading


 Interior is 4 pages of Black Merino Wool felt that I like to keep on hand for projects of all types.

For the interior support I used a cut to fit  5x7 bubble wrap envelop instead of book board.  the exterior was made with two Moda  pieces and some lovely cotton 60 wt thread.

To make this machine I tried out my new Vintage Elna Diva


This is my third one, this one I am keeping if I move again!

Here is #1 Sold in MA


#2 Sold in TX

I have an interesting story about #3 that I will share a little later that has to do with this:


If you like to work on machines or just work on a machine that you like, you might be interested in this up coming post.  Spoiler - this $4.99 service manual saved my at least $150.00 and and brought #3 in to original stitch work.  

I hope you are enjoying your summer and thanks for stopping by!
Ginny M


Friday, June 28, 2019

How to Thread Paint on a Juki 8700

Wow the summer is finally here! I've been busy with summer things and family visits and I wouldn't have it any other way.   Yesterday I able to spend a couple of hours working with my new Juki 8700.  I purchased this machine to sew and quilt my Mission Project  and to thread paint.  Ahh, I love thread painting and there is nothing better than doing it with a fast smooth machine.  Having a quiet servo motor and a large throat space, makes this machine perfect for the job.  I am making it sound simple - but initially it wasn't.  I had to find the right foot
 - which I did for a reasonable price   this price is about $20.00 less than Amazon or Ebay.  This foot made the machine sing!

For a first attempt I wanted to make a little gift for another Artsy friend.  These colors work for her space and style (I think!).  This became an exercise for me to become acquainted with my machine.

The first step (after finding the right foot for my machine) was setting up my thread.  I have a beautiful collection of vintage cotton threads, I wouldn't trust them in a seam but I LOVE the rich color and glow on the surface of fabric.  I look for and save theses threads for thread painting - most of the time they work beautifully.
For this piece I used two threads through the needle  and tried several colors and bobbin embroidery threading the bobbin.


I tried several ways for the thread path


This is what worked best - it did not tangle during the run.


To use the top tension or not?


Not using the tension worked best

Getting two threads through the needle eye - I used a #14 needle nothing special

A cheap-o needle thread made it easy. I used a yellow cotton thread in teh bobbin


I changed out my foot and put a guard over the feed dogs.

I took the guard off  dropped the needle bar  pressure  reduced the thread tension and set stitch length to zero, that worked just fine.  These are the tweeks you would have to make any machine and if your memory is challenged - write it down  and keep it by your machine.

I took a scrap and added my stabilizer, and did a little test.  When the thread was in the top tensioner it made it the movement very difficult, there was no flow and I could not move the fabric easily under the needle.


With the top tension skipped I was able to find a nice smooth flow.


 With thread painting and free motion quilting you have to develop a rhythm between your hand movements, and machine speed - these factors determine your stitch length and maneuverability.  All it take is persistence and practice.  Play, develop your hand at this and you will master it in no time!

.  I marker my wool felt with a white quilt marker I had handy and just filled it in with stitches and colors I liked.  This flower required about 20 minutes of sewing time and it was really fun.


I stitched the flower and the petals onto a backing and then  together.
The center was a do-dad I had in my stash


I will turn this into a mug rug or something for the gift.  I wanted to share this with you, and let you know it is worth the initial effort of figuring out how to make your machine do what you want it to.  When I first got the Juki and could not get it to freemotion I was ready to toss it through the window I was getting so frustrated.  The machine was not doing what I purchased it to do and I couldn't take it back!  Sometime you just have to step away and rethink the process.

Hope this was helpful  and have a great day!
Ginny M


Sunday, May 12, 2019

The Start Up

In my last post I talked about  starting up with the 'Heartstrings' group again and making quilts for the homeless in Utica and sick children.  Since that post several weeks ago I have been super busy getting everything in place to start making.  I thought I would take you on a little tour of the start up.
In anticipation of having others help me accomplish my goal, I have to organize and sort the ,material to make kits.  Each kit will make one quilt.  I found the last round this worked very well.

After two weeks of cutting I have a start on the "strings" foundation blocks and center strings


I sort by color family, this makes it very easy for me to create color coordinated kits

Yesterday I picked up another 50 yards to cut into 2" strips know as Strings.
Today I washed, tomorrow I cut.


In several  generous donations of fabrics and blankets I have a stash of battings and backs.  The blankets will be used for batting.They get stored in large tubs, I will wash them when I am ready to use them 


I also use vintage machines for this project.  The initial sewing of blocks does not require a heavy duty machine, but the quilting and binding does.  Hopefully I will have an industrial soon but for now here is my set up:

A dual drive kenmore for the piecing, quiet, nice and smooth.  This machine was given to me by Lenora, she also donated a ton of fabrics!


A tank of a singer with a potted motor, 15-91 for free motion quilting

For stitch in the ditch quilting and Pfaff 1222 SE with it's IDT - a walking foot.


and even a machine to attach the binding - this old kenmore will sew through just about anything .

And a machine for a helper - a sweet little singer - this came with the 50 yards of fabric.


I love vintage machines, all of these were purchased second hand and cost under $100.00 together.  It helps that I can clean and repair to get them in tip top shape.
I have a beautiful Janome machine that I reserve for garment sewing.  I am sure it can handle anything I put under the foot, but because it is computerized and newish I tend to baby it, I want it to last into the vintage state! 

Tomorrow I have Lenora coming over to learn how to do one of these quilts and if she isn't camera shy I'll post a few picture of our progress!

Thanks for stopping by and I hope you have a great week!
Ginny M


Tuesday, April 30, 2019

An Old Project for a New City

Spring is starting to peek its head out here in CNY,   and with the spring,  new projects.  I've put away the ink pads for awhile and pulled out my sewing equipment.  I love hand embroidering and many types of machine sewing.  My love for needle and thread was sparked by a local Craft Guild that meets x2 a month in the day time, making everything from quilts to cards. I was invited to make cards for troops and left thinking I must unpack my sewing things. So I did, I've spent two weeks reloading the craft room.  Picked up a few new (used machines) and I am ready to stitch and sew.

While in the midst of setting up I felt like I would really like to do the Heartstring quilts for homeless and needy in the Utica area.  And as these things work out I mentioned it to one of my friends who lives in Utica and she said  "I have just the contact, He is very involved with the homeless in the area and I know he would love to receive the quilts to distribute". And so my Project was born.

I put out this request on my FB page:

Steve and I are starting a quilt for the homeless and needy project, to my local family and friends - if you have any fabric, flat sheets, blankets, or curtains I can turn these into warm quilts for needy people in Utica. Just tag me and and let me know if you can help, I can pick up. If you are interested in sewing, let me know, all materials will be turned into kits that will be easy to make into quilts. In 2011 we made with the help of Crossroads Ministries 35 large quilts for the Springfield Rescue Mission. I use the Heartstring Pattern and can use just about any fabric.

I've had calls and texts saying I am cleaning out would you like these...  yes I would

So I've prepared a sorting center and will start cutting amn making kits, I have two people say they would love to sew.  

I'd love to share this with you all as it progresses

Here are two of the 35 quilts we made in 2011 - these are all scraps in these quilts.


If you are interested in learning more about Heartstrings method and mission - here is a link to the Blog:
I make these fairly large aprox 60"x80"

This weekend I am going to our Yearly Women's retreat and plan to work on a hand project  in between times but when I get back I am ready to roll on the heartstring quilts.


Thanks for stopping by and I hope you have a great day.
Ginny M


Friday, March 15, 2019

Have you tried an InstaPot? Why I choose one and a delicious meal.

About a month ago I decided to add an Instapot to my kitchen arsenal.  I had been looking at alternatives to my Cuisinart electronic pressure cook and my little electric rice cooker.  The reason for the search - teflon.  Both of these appliances have teflon coated cooking pots.  It has been noted that teflon and such nonstick surfaces once they begin to break down, become a true health hazard!

"According to the Environmental Working Group, teflon and PFOA (which is the chemical used to make teflon) are some of the most persistent chemicals in the world. Their toxic legacy will outlive every one of us, and the next 25 generations of our offspring. Ironically, it may shorten each generation’s lifespan, as well. PFOA’s effects include liver damage, immune dysfunction, thyroid dysfunction, and a decreased ability to fight infection"   If you would like to read the rest of this article, click here.

I haven't rushed into this, I have had both pots for 4+ years and I have been so careful not to scratch them.  But with my auto immune issues and Steve's' battle with cancer 7 years ago, I am just being as careful as I can be.  I am diligent about our nutrition,  using safe cookware is just another layer of caring for my family. 

And I won't lie, I was ready to jump on the instapot band wagon - I could have created the same great foods with Cuisinart  cooker BUT the instapot has a stainless steel  cooking bowl and there is no stainless replacement for the Cuisinart.  I even wrote to the company asking if it was in the works and why it was important to me.  No response and no replacement on the market.

I have made three meals with this so far and I am really happy with it. Last night I made fork tender ( really) pork chops with mushroom gravy, mashed potatoes and squash.  It was so good I felt a little sad that I filled up so quickly!


Maybe it was the walk with Steve and Max with the freezing cold winds blowing across the  fields  we were in.


 Beautiful farm land in CNY - over the creek and through the wood behind our house


He just can't get enough of it (snow and farm land) and was also very happy with a bite of pork chop!

I have been using this cook book - last nights recipie is on page 226

I made a few modifications - I used goat milk in the gravy instead of cream ( dairy allergy) Margarine instead of butter and de-glazed the pan with white wine after the saute stage. 

Sadly after Steve's lunch for tomorrow was made there were no more left overs


and next time Max says a whole chop!

Thanks for stopping by, have a great day!
Ginny M


Thursday, March 14, 2019

How to Make and Pressure Can Carrot Ginger Sweet Potato Soup.

I love soups, all kinds, any weather any meal.  Some of my favorites are also what I call 'healing soups' .  These soups are not only packed full of flavor, they are packed full of nutrition.

Most of my soups start with homemade Chicken Bone broth.  Bone broth is on a continual production cycle here, I use organic chickens and pure water.  If you have auto immune issues or any chronic health problems bone broth will help nourish and heal your body ( sorry I am not vegan or vegetarian- not yet anyways). I also keep veg broth in production for soups and cooking .

Today's recipe is a wonderful antioxidant rich soup that will energize  you, and for a bonus I am going to share a favorite breakfast soup

Most of my cooking is using what I have in my pantry, what I have found on sale and what is is season - during the growing season,

The ingredients are listed but you can adapt this to your taste, this is a highly flavored soup!  Use organic if you can!

4 quarts Chicken Bone or regular broth
4 lbs  carrots
3  cans  sweet potatoes (pumpkin works too)
2 lbs onions
Salt and fresh ground pepper to taste
3 TBS powdered ginger ( I slice, dehydrate and grind my own ginger about twice a year- It is so                      much better than store bought!)
3 TBS Turmeric
3 TBS each, Basil, Marjoram and Thyme
1 TBS Rosemary
3 TBS Cinnamon
1 TBS Nutmeg
1/2 cup dehydrated celery or 1/2 head
dollop of honey

Shred the carrots, onions and celery if you use fresh and add ginger.


In a large stock pot ad the veggies and 1/2 broth.  Simmer for about 1 hour


With a stick blender liquify the veggies - or place in a high speed blender to liquify - just be careful the mix is hot - allow the steam to vent  in a blender or you will have a nice new orange ceiling.


add remaining stock/ broth and add spices, canned veg  and dehydrated celery of you used that.  simmer for another 1/2 hour.


Blend again until creamy

at this point I turn the heat off and let it cool down a bit.  
you can freeze this soup or can it.

I canned this batch using my Carey Canner;

In clean hot  pint jars, fill leaving 3/4 inch headspace.  Clean the rims of the jars, add clean hot lids and clean rings


Place in your canner, electronic or stove top - follow the directions in your manual for SAFE canning
I processed 40 minutes ( 10# pressure)


12 Pints canned - 1 quart set aside


 Beautiful rich soup, I did not remove the fat from the broth I used for this soup - sometime I do a fat free bone broth.


Now for that bonus recipe!


Kale & Apple Breakfast soup!

Add several large handfuls of fresh kale, 1 peeled and cored apple, 1 pint soup.
Mix in your blender - I can turn my mix into soup by using the high speed for about 4 minutes.


This just tastes so good, you would never know you were eating raw kale! I find a bowl of this for breakfast keeps me  going all day with out being hungry or wanting to snack.  It is packed with vitamins and nutrients!


Hope you give this recipe a try - your cells will say thank you!
Have a great day!
Ginny M


Scripture Writing Set up for the Week

I have been following a daily scripture writing program for four years now, the more I do this the more I love it! It is one small process t...