Sunday, March 31, 2013

Nancy Sara Burns Maxam


I won't be posting for the rest of the week, my  wonderful mother in law and friend of 12 years suddenly and very unexpectedly passed away Friday.  Nancy was born in 1940, married Richard in 1961, went on to have four sons who grew to be good men, husbands and fathers.  I am married to her third Son, Steven.  There are 9 grand children by birth and my children by adoption.  In every one of the Maxams I see her love and strength.  The Maxam's are a wonderful loving family , Nancy will be missed and her memory Cherished.


Nancy Sara Burns Maxam
 
August 12th, 1940
March 29th 2013
 
You are loved

Thursday, March 28, 2013

Invisable markers


Like everyone else I have my favorite coloring methods and I was reminded this week of how much I like my favorites.  What reminded me was a lovely sales person trying to sell me on the importance of owning a set of alcohol markers that sold in her shop for 6.95 each.   A complete set would run around 3,000.00, the reinkers would be another 2,300.+ and who wants an incomplete set??  Actually I get a little drooly just thinking about owning a complete set... yes this is a Internet photo...
But  a complete set, throw in storage containers, a few new nibs and must have other necessities and you are looking at a capitol investment of 6,000.00 for magic markers to color with.  Now maybe I am crazy but that sounds like way to much money to do something that looks like my water coloring that cost me 24.00 every two years.  If I were an illustrator, If I had any skill in marker coloring, if I had a sponsor or a huge gift certificate, I'm pretty sure I'd want to try it.  But since none of those things are in my reality I have to work with my old school favorites, water colors, prisma pencils and chalks!  Now I don't want you to think I am not embracing the 21st century, I am!! I use Bic markit's and sharpies at least once a month to color gemstones on my cards, and I do have a full set of Tim Holtz distress markers and I like both very much!  Actually I Love the TH color palettes, I have all the distress pads and reinkers and most of the stains and a few of the daubers.

One thing I noticed with the TH markers, they do not like to be left standing.  I do use these markers often - mostly the brush end.  I  realized my pen tips were drying out from standing.  I had a bunch of invisiable markers!!  I came up with a quick solution on my running out of space desk top:


This a flyer holder I found going in  a trash can at the church officeThe good news was that after 48 hours of sitting in their sides they worked perfectly again!!  I thought this was worth sharing if anyone else was having a problem with the  TH markers, don't toss them before you try laying them on their sides!
 
I've had a lot of fun playing with new G45 papers, here are a few of the cards I made in the last couple of days:


These are all for sale and only a few of the new cards for the week, you can find them on the "whats new page" located on the top right side bar.
Thanks for stopping by and have a great day!
Ginny M


Tuesday, March 26, 2013

Ribbon envy and WOYWW #199

Happy WOYWW#199!  The world wide blog hop Starts here: http://stamping-ground.blogspot.com/ On Weds our time around 2am. 
 
Julia does a wonderful job of hosting this work desk fun!
 
 I start the post early so I can get it linked before it ends over in OZ!! 
 
 
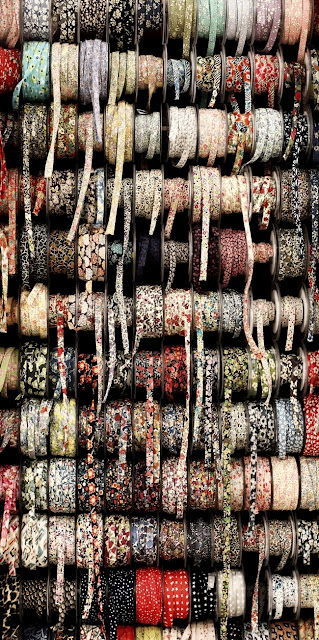
What started an innocent pin from pintrest turned in to a little bit of  coveting (I know I am the only person that goes to pintrest and says I want that!!!) and then into a great idea!!  Now I am thinking this is a shop photo and not part of a private collection, but no matter I wanted it for my own card making!!!!
 
Okay now you want it too, I know it, even if you can't say it!!
I could just see all the beautiful cards I could make and sell, if I only had all this ribbon and maybe even a little more! That is what happens when you start to covet, you never have enough!
So I had this flash of insight
 
Use what I already have!  What I have is yards and yards of beautiful premium quilting fabric that I am not quilting with right now!
And a rotary Cutter
And a Kurieg cup holder!
This is what I ended up with
and this is what is on my Work Desk!
 
 
Turn
 
 
 turn again
 
 
I used a scalloped rotary cutter and  "fat quarters" to make these ribbons
 
 
I cut them 3/4 -1/2" wide


For this batch I used some of my batik fabrics, for my kids cards I will make ribbons from kids fabrics, or use fabric that will suit a particular motif that batik does not work with well.
 
Here is a card I used the ribbon with:
 
 
Oops I know the sentiment is crooked, but you get the idea!!
 
This is the note that made my day:
I always try to leave what I make out on my desk so that my husband Steve can take a peek at what I've been doing, before he leaves at 6 am for work.
 
 
These cards will be in the card  shop in a couple of days, I have to finish the batch.
 
Because I used a "pinking" edge cutter the fabric won't fray.   48 fat quarters fit on the Kureig cup holder, and that sits on top of my wood "Word" stamp box, out of the way.
 
Thanks for stopping buy and enjoy the rest of the blog hop!
Ginny M
 

Saturday, March 23, 2013

Road trip to a new Shop!!

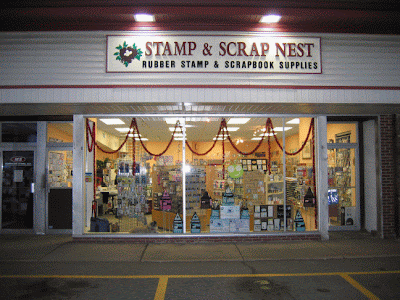
Today was a fun day, last minute so to speak I asked Steve to take me to a terrific stamp store in Simsbury CT as they were having a "Tag Sale".  For those of you who have never had the opportunity to go to one of these this is how they work:  A local stamp/scrapbook stores will take in stamp/scrap items from their customers to be sold at tag sale prices.  The shop will have the tag sale and the donors items that are sold are tallied and the donor receives a store credit for the amount of their sales.  So this is a win win for everyone!!  I went through my supplies and discovered I had one available stamp pad I could drop off. Needless to say I didn't!  


                                                        Here is a photo of the shop
 
Inside was a stampers dream come true!
This was a very easy shop to shop in, a huge variety of things layed out in a manner that was fun to shop in and not overwhelming.
 
Firstly the staff was so friendly and helpful. This is Sharon and Pat
 
This is Cathy and she helped me navigate through the tag sale goodies!!
 
And Susan the store owner,  left her lunch to demonstrate copics for me!
 
The Store offerings were awesome, there was something there for every style and expertise of stamper and scrapbooker.  From cute to steampunk there were quality stamps, papers, and tools to excite a longtime stamper like myself!!  Not that I am a snob, but you know, same ole, same ole is boring in any type of art.  Not here, there were new products and the latest stamps and papers released from winter CHA! 
 
 
One thing I really appreciate about this store is they had a lot of different types of ink pads AND they had the reinkers to go with them!!  This shot isn't all the ink pads by any means!
I also felt the pricing was very good!  I'm kinda cheap and when I look at a rubber stamp I have to know I will be able to use the image in many ways and the price can't make me faint!


Bad picture of beautiful papers!!
 
 
Copics and Smooches!!!
 
and this is what I came home with, not shown is the picture is the G45 papers
 
 
 1 paper cutters, 1 circle cutter , 8 bottles of spray inks, 13 rubber stamps and a stamp pad (tag sale and new) 48.00!!!!
 
It was a fun time, Steve always has a great eye for new images and colors and since he is my best Friend he is the best person to go with!!
Unfortunately he edited his picture off my camera!!
 
Now I have to get back to card making!!
Thank you for stopping by and here is the link to this great shop I visited!
Have a great weekend!
Ginny M.

Wednesday, March 20, 2013

Card Shop is Open!!

I've been working at selling my cards locally in several stores as well as on the Web.  Our .com store "MaxammadeStudio.com" has been very difficult to use, We are looking for a new web host but in the mean time I'm setting up the studio store here! The categories are in the pages columns off to the right side bar just click on the appropriate titles! Do take a look at the ordering page for ordering instructions.   Today I put up the first batch of cards, I will have many more and if there is an interest I will also sell paper and embellishments.  My home page will be the same, now you'll be able to easily purchase the cards if you don't want to make your own!!

One of the first things I did was to make a new photo box to take new pictures of the cards:
 
This is foam core held together with shipping tape hinges!  When I'm not using it, it folds down flat and is 10x15 inches and a snap to put away!!
 
The rest of my room looks like a bomb went off and since it is 2:45 am It'll have to be picked up later!
 

I had my stack cutter on this, but I moved in another set of drawers and put the stack on that.  Now I have to find room for the stacks of shipboard you can see under the shelf plus a case of adhesive.  This just stayed in the room because I thought Tink would like to sit on it and be more in the way.
 
"I'm so bored"
 
 
More drawers to store card parts and my quilting fabrics in.
 
I still have stacks of cards to place into sleeves and get ready for a delivery tomorrow, desk is a mess too. I don't drink Arizona tea, but the boxes are great for putting card kits in and they are free!!
 
I'll also have lots of nice things to tuck into my card packages, that will be another project for tomorrow, finishing those!
Thanks for stopping by!
Have a great day!
Ginny M

Tuesday, March 19, 2013

Snowing again and WOYWW# 198

     
 Snowing again!
Other than a little snow in March the good news is it is time to see what's happening on desk tops across the world!  You can continue the fun by going over to the UK and  Julia's blog here:

Today on my desk is a swap finish for Oriental Stamp Arts ( http://groups.yahoo.com/group/OrientalStampArt)    This was for  the Horse Mingle:


I used a magenta stamp for this image, heat embossed with black ink and black powder on a 90# parchment card stock.  I then painted it with H2o's.  The turquoise is a bold brush recollections marker that I also used to turn the background white of the ribbon into  turquoise. I layered the card on black then gold.   The card base is a 90# faux leather black card stock.


The card image is about 4.75x 5.75 I cut the base to be 10x6 and brought the two long edges together to form a pocket. I used a round punch to make "tabs"  I'll show you a more obvious color:


 To close the "seam"  I used a lot of ATG tap on the ribbon and put it over the meeting edges, ran it around to the other side.  This also keeps the interior card from falling out.
 
 
I used another piece of the parchment for the interior card and attached a piece of ribbon to pull it out. 
 
 
The last step was to affix the image stamp over the top.  This pocket card was easy and it was  fun to make.  Something a little different with out taking an hour to do!
 
Lastly on my work desk is a new addition!  I found another ink pad holder at the goodwill store!  This one (the one on the top) was in new condition, it has the napa valley brand mark on it's side and was only 5.00!!!


These sell for around 50.00 on the Internet!  It holds 105 ink pads!  If I change my stamp room colors (I've got the itch to do it lately) I can spray paint these easily!

Thanks for stopping by and I hope you enjoy the WOYWW blog hop!

Tuesday, March 12, 2013

WOYWW#197 it's 2:30 am

It is WOYWW#197!  Go Here to Julia's blog to join the rest of the world wide blog! http://stamping-ground.blogspot.com/ 
I am Posting my blog at 2:30 am EST , Why? I don't know I keep asking my self why I'm up making kiddie cards at 2:30 am - Even Hallmark which is 15 miles away is closed!! My Dog is up because I am up, the cat is sitting on something in here I will be working on next, and I am typing. No wait I am keyboarding, Typing is something I failed at about 30 years ago.

I have a big order to produce which requires a start up for a local store, I need to have about 150 cards for all occasions ready for next week, and then a couple dozen for another local shop also next week.  This is good!

Tonight I started making a batch of baby cards, first welcome and then birthday.  I've got the birthday done, and all the parts of the welcome baby cards they need to be assembled.

So that is what is on my work desk, baby cards!

First the card bases in baby colors, I'll explain the giraffe cards in a minute....


Die cut flowers with the ebosser machine.  I love this machine, it is an electronic embossing and die cutting machine, large 9x13 platform and can take any die or embossing system.  It sells for under 200.00 , I've had it since September and use it every day, no learning curve and no problems! I started embossing with a pasta machine, up graded to a wizard, then to a grand caliber.  I have hand issues so with all the cards I make, all that cranking was crippling.  I love the ease of the electronics!  I do have a wizard tucked on a shelf for workshops here and on the go.  I'm not going to be toting the big ebosser around with me!


Die cut banners on the eCraft, the eCraft is great for cutting labels and tags but for more intricate work, not so good.  I've had my machine for 2+ years with a few problems that the company took care of, no hassle.  I would love to cut paper lace, but with this machine it won't happen.  It has however cranked out thousands of labels and non detailed cuttings.

First round of baby cards, when I am done with this group there will be about 40

 
I made a dozen of these because I really am not a fan of pastels and after doing 75 pastel bases, I had to do something in colors I liked!
 
Thanks for stoping by and I hope you have a great day!!
Ginny M

Saturday, March 9, 2013

Little Sparrow

I made a batch of Sparrow cards  yesterday and today.  I am trying a less is more look.  There are a lot of  CAS challenges out there with great examples of clean and simple.  CAS poses more of a challenge in getting a beautiful and interesting card with minimal surface treatments than  cards with many layers and interesting items on it.  Since I strive to keep all my cards mailable in an envelope I don't do to many with alot of 3d embellishments.   
The stamping industry has created and developed so many wonderful, beautiful tools and embellishments for this art form it is almost hard to keep up with.   When I started out stamping I had  images -  some of them I cut myself on purchased linoleum tiles and even one from an old sole of a shoe - and an old office type black ink pad.  What this made you do was develop good composition. In the early 80's  rubber stamp sets were starting to appear in stationary, museum and fine gift catalogs, Posh impressions and their wonderful products, especially fat nibbed markers, introduced easy  coloring to stamping.  The 90's brought an explosion of colors and papers, and amazing new stamp companies. The 2000's brought us textures and die cuts and layers and more textures and more layers!
 In my stamping world, I am getting back to basics, better composition and visual impact through less texture and less layering.  I still like layers and textures, but I am not trying to make my cards mini albums.


I used my stamp press for this project, I made 20 of these little birdies, once I got the stamp conditioned and inked properly it went pretty well, after getting 20 good images I racked up only 3 non usable, which I used as testers.


I trimmed out some of the rubber after seeing the  "halo" markings. I used Ranger Archival ink.


 I added my verse, no background or layers, just stamped on the image paper. I used stickels and liquid pearls for the blossoms. The liquid pearl really made the little pussy willow bud pop!


I used colored pencils on the sparrow and the branch and blossoms. I also added brush strokes with gel medium.  One last pearl drop for the eye.


I had originally planned on just a simple layer for the image, But it really was too flat, so I added a white background and then the pink bow.  I stamped an image all over the edges of the background base to bring focus back to the image.  Without it,  again it was too flat. 


This card didn't come out as simple as I had originally planned but I am happy with it.
 
Mathew 19:26 is a verse that I love.
 In the Text, Jesus is responding to his disciples as to who can be saved.   They are frustrated with the difficulties of working with people.  One of the most important parts of this answer is seldom used and I think it gives the rest of the statement so much more hope.  What Jesus said was " With Men this is impossible, but with God all things are possible"!  What he did was take the burden away from the disciples and from us saying there are just some things we cannot do,but                            He can and He will.
That gives me a great deal of comfort and it is freeing.  It takes the burden of things I can't do but need to be done and delivers them to Him who can do and will do.
We all have things in our lives that we look at every day and think ' how am I ever going to get this taken care of', It is those things that our Loving Saviour delights in making Himself known in our lives.  We just need to turn it over to him, take our hands off the problem and lift them to Him the problem solver.
 
I hope you have a wonderful day and thank you for stopping by!
Ginny M

Scripture Writing Set up for the Week

I have been following a daily scripture writing program for four years now, the more I do this the more I love it! It is one small process t...