Tuesday, October 31, 2017

Masculine Cards on Kraft Paper, Alcohol Marker Coloring and Freebies

I needed two masculine cards for family members in the mail today talk about feeling rushed!  I pulled up a couple of favorite digitals and thought these would look great on Kraft paper and colored with alcohol markers;  I'll show you the cards and then go over the details.


Showing you the end results first can give you a better idea as to whether or not you like the finished product - before investing time and supplies.  Because I was pressed for time, doing two cards at once with the same manly man color palette helped me save time and really made making these cards very enjoyable.

I printed these cards on Neenah desert Storm 80# paper from Paper Temptress  This paper is super smooth and holds the ink in a clean crisp perfection.  This is my favorite Kraft paper to work on any hand stamped ink works as well as my inkjet printer.  Also when you purchase from Pat ( the Paper Temptress) you have the option of buying 5 sheets or larger packs al the way up to 90!

I create my palette swatch and start coloring - the markers work so well with this paper- super-smooth blending - you can't blend on many lower quality kraft papers.


All colored up


I pulled papers from my stash and created the backgrounds, dry embossing a printed paper and distressing


A little trick - easy way to create a stronger edge - run the edge of paper on the edge of the ink pad 


Using the best papers and taking your time coloring will help you create a little work of art, but here is another tip:  Use the Best Glue Ever, especially on your heavy, textured, embossed, inked, foiled, and distressed papers.  A long time ago at stamp camp we were told to use score tape, "you have to use score tape or the adhesive will never hold on the heavy, textured, embossed, inked, foiled, and distressed papers.  Well Best Glue Ever holds it all perfectly with a tiny amount/ 


And a BIG bonus here, if you lay it down crooked - you have a few seconds to fix it!

while my markers were out I whipped up the second card.  The white areas in both of these cards is a white 'Posca" pen.


I actually got these in the mailbox with a few minutes to spare! 


For making cards for the guys in your life:


 I hope you try these out and try the products I have demonstrated for you, no craft room should be without them!  Needless to say, I have sent all my old kraft papers to a new home and all my score tape - along with a drawer full of no longer needed and used adhesives!
Have a great day!
Thanks for stopping by,
Ginny M


Friday, October 27, 2017

How to create a slightly different napkin card and a new series - Stash Busters!

Hi everyone!  I am in Florida with my daughter and we are waiting for Baby Aiden to enter the world!  I've got months worth of crafty posts all lined up and something new - a minis series I am calling 'Stash Busters'!  You know all that stuff we have hanging around?  I'm working on using it in a fresh new way! 
Today is my first "Stash Buster Post"  you can find them by searching the label 'Stash Busters'.  I've got a LOT of stash so this could go on for a while!

here is the first card and if this interests you, keep reading!


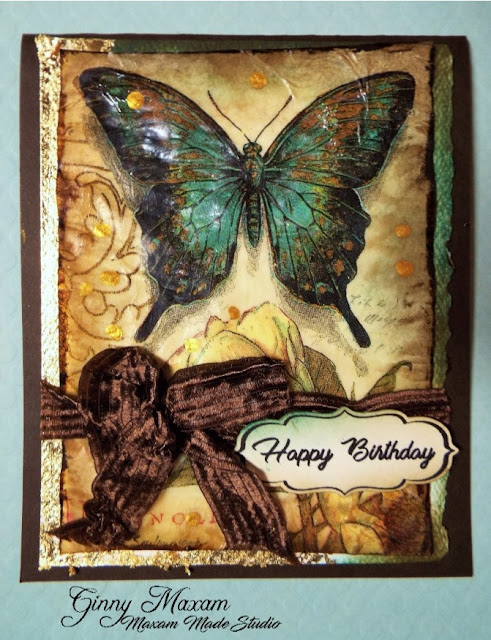
This card started out as a humble napkin!

I was able to make three cards from one napkin and three ATC's

Section out your focal images and separate the printed layer from the backing.


I tried this several ways, they all came out the same;
Line up your image on a thin paper, tracing paper works great or you can use copy paper
Using a pvc glue (I use Lineco)  just coat the front for the image


and then let it dry, it may take a few hours. 


When this dries you will be so amazed!

I added lots of vintage photo distress ink to the edges and a bit of peacock
A few splats of gold in and a bit of fiber from my stash


To give the edges of the card base some pop, I also used distress inks and  a little leftover gold foil.


 Each one comes out a little different. the finish feels like a fine vintage parchment, there is a slight gloss to it, but if you don't want any shine you can use a matte finish mod podge. Or experiment with any of your stashy gel mediums!  This is a fun and easy technique to play around with!


I hope you give this a try!
Have a great day!
Thanks for stopping by!


Thursday, October 26, 2017

How to Make a Beautiful Shimmery Mermaid and a Fun Freebie

                          I decided to make a pretty tag for my boxed swaps at the October                                    Split Coast Stampers Event in Ilion NY.  
The was my first time attending an event like this, what a blast! 
Each 'Shoe Box' needed a tag or label to identify who made it and what was in it.  I am really not sure why I picked a Mermaid.  But I am glad I did! I also needed to use an adhesive that I could paint with a fine line and know it would hold my beautiful flakey glitter.  Here is the end result:


The process

The digital image


Painted with Spectrum Noir Sparkle pen
In case you are wondering, I painted extra "clothes" on this mermaid.

And then very quickly added a layer of Best Glue Ever


The reason this is really the best glue for this project: it dries soft and flexible, it never makes your card brittle or rumpled.  In this case, it allows the flake to retain a measure of dimension instead of flattening out.  Another good reason - time, it took 30 seconds to lay the glue on it with the fine tip- No Oops! once the flake was applied, it took about a minute to dry - that is nice!


A little gentle pressure 


Dusted off:


And there they are 4 fast, fun labels!


Freebie for you!


Thanks for stopping by and hope you can use this!
Ginny M


Wednesday, October 25, 2017

Word Art Wednesday!! And A Scripture Freebie

I am happy Today to share  Word Art Wednesday, with you! Every other week we have a new challenge, A fresh devotion, a beautiful Scripture digitized and freely given for your card making and paper crafting! I don' think there is another blog like it!  MAke a card ( you can make up to 5) enter it in the challenge and you might win a super prize!  Don't forget to mail the card - I am sure you there is someone in your life that could use the encouraging.  I don't know anyone who doesn't love to receive a beautiful handmade card!

Here is my card:


Here is the Bible verse by Karen Murray!


I encourage you to join in, be blessed and be a blessing!
Thanks for stopping by,
Ginny M

Saturday, October 21, 2017

Magenta Southwest Thanks You's

I needed to make a batch of thank you's for friends out west. 
This batch I made with a south western theme. 


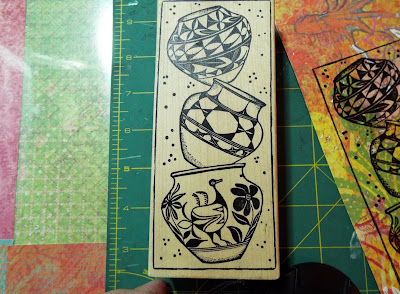
I love Native American Indian Pottery  I have a few lovely  Rubber stamps of the Indian pottery.  This one is a Magenta, it is a large stamp and perfect as a focal point.


When I am making cards I prefer using singular focal images, I have never had much success at building small images for  card making.  

One of my favorite techniques is heat embossing on patterned paper and then fussy cutting:


Professional designers create beautiful papers, I am all for using them as much as possible, they make me look good!


I picked out layers and bases.
The card bases is a Strathmore textured deckel edge, this paper is the color of stucco and A favorite!


Stamped on craft and cut


Back ground through the crimper (yes, I still use mine)!


Simple


and completely mail-able
These cards are 6.5x4.75, and odd size.  I purchased a cases of envelopes: 2400 for 15.00 a couple of years ago and 4 large boxes of the Strathmore paper.  I had all of the papers cut to my specifics sizes.  A2, A5, A6 and A7 which matched the sizes of the 4 cases of envelopes.
Sometimes you come across these awesome deals and ya have to go for it!
all that paper and envelopes would have retailed for about 3,000.00  I paid 300.00!

The batch:


I have also used this stamp to make great book marks.

The Stamp I used:

20.008Q


This is a really fun technique, so worth trying!


Thanks for stopping by and I hope you have a great day!!
Ginny M


Wednesday, October 18, 2017

How to Create a Lattice Cut and Distress Oxide Card

I'm probably not ever going to be the first person with a 'how- to' when new products come out.  I Love them from afar and that is just fine with me.  Why, because I have a significant investment in things like inks and paper.  My hope is to become proficient at one thing before I move on to the next. I kinda skipped the whole dye and stamps with matching dies trend. They take up to much room to store and time to use.  I am so glad I followed that path and waited for the Scan n'Cut  to be invented and then a little longer so that I could afford to buy it.  I also only own about 10 punches - butterflies and little flowers.  At one time I had a large collection, but because I bought a Cricut, I sold them! I don't own a package of prima type flowers and If I never bought another ribbon in my life, I'd still have way to much!  Why am I telling you this?  Well, because I never want to be a person that says buy, buy buy, just because it is out there.  I do want to say use it, use it, use it and learn more.  Learn more about what sets your creativity soaring, what makes you happy!  Buy the best you can afford, quality, not quantity. when you use quality products your art will always look better and you will feel better about what you are creating and in the case of cards, you will be proud to mail them off!

I said all that in part to say, I finally got my distress oxides out and made a card.  I really do like the Distress products and was excited to give my newish distress oxide inks a try.
They were fun and I think I need to watch a few more youtubes - I am not in love yet -I do love my regular distress inks and use them all the time!

I'll show you the card and you can decide if it will be worth reading the how-to.

I really like this quote!


Using my Cricut I cut a card from Anna Griffin Cartridge
I used a fine blade and opted not to score on the machine


This gave a beautiful sharp cut.  Some blacks cut with a raggy edge, not this one, smooth and clean!


Next, I double scored 1 mm apart - I use the Cricut Stylus for hand scoring - it works so well!


Next I splotched my oxide inks on my craft mats


Adding the water was pretty cool!


Next, I just laid my 120# Heavenly White in the wet ink and let it soak it up. Pretty easy! 


Let it dry. I colored my butterfly while this was drying

Using my needle nosed Best Glue Ever I dotted the glue on the  inside of the paper lattice


I slipped the dried Oxide background  and carefully placed it


And then put a weight on it to dry:

Anyone remember this guy?  He's survived 4 moves now!!


I created my sentiment panel from a bit that was left over from the base


Really beautiful cutting!


I hope you found this helpful and the quote inspiring!
If you are new to crafting, here are a few things that I think are must haves' - the rest will come with time.  When you give your self this time you will find you will evolve into a better crafter and not spend money on things you will never use.

Good Papers - it is the foundation of your art, I highly recommend Paper Temptress
3 cutters - one guillotine for multi sheets, one rotary cutter, and one travel size. I use a Tonic guillotine, large and travel size and a Genisis rotary trimmer.  I've been doing this for 40 years - these are the best cutters I have found for a reasonable price.
Good scissors, large and Itty Bitty - I like Tonic
High-quality inks - I use memento for alcohol coloring and Archival for watercolor
Distress inks and Memories
Coloring.  I use Alcohol pen, waterbased markers, watercolors, pastels, colored pencils
Ultra-fine sharpies - for touch up stamps
Misti Stamp tool


I hope you found this helpful and the quote inspiring!
Thanks for stopping by!
Ginny M


Scripture Writing Set up for the Week

I have been following a daily scripture writing program for four years now, the more I do this the more I love it! It is one small process t...