Friday, July 31, 2020

How to Make a Quick Slimline Bible Verse Card, Links, a Tip and Freebie

Happy Friday Everyone, A beautiful day here in CNY and I am about to head outdoors but before I do I wanted to share a super quick card making Idea.  
In my Digital files, I have a wonderful folder of bible verses illustrated by various artists. I do lots of handouts for Sunday School and other church-related things.  I also leave some of these beautifully printed scriptures on tables in restaurants ( With a good tip! Someday I will share the story of a pastor who brought 18 people to dinner on a Sunday and left his waitress - a 19-year-old me- a tract and no tip!). Actually, I will leave these anywhere I can.  But today I made cards with bookmarks.

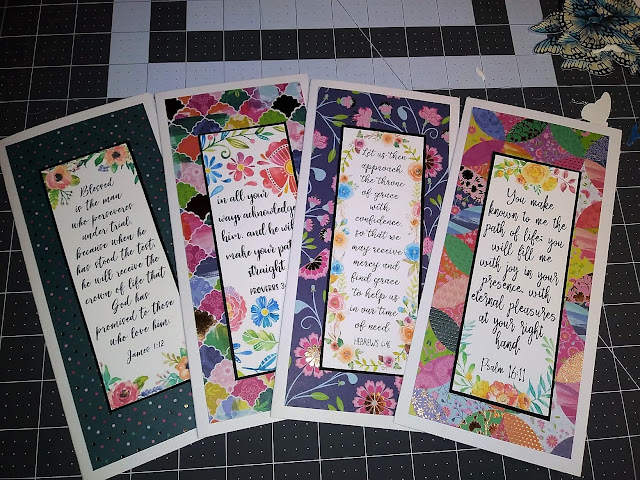
The latest trend seems to be the slimline card; 4.00" x 9" in a business-size envelope.  

Here's the set of Cards:


I cannot seem to find the designer of the bookmark I used, but if you go here to Etsy you will find many wonderful designers


Here is my Tip for the day;  We all seem to end up purchasing numerous cutters until we find one we are happy with, Well this was one of the ones I liked but because I do so much cutting and use CS 120# + this was not practical. I decided this could be solution to scoring this heavy cardstock - especially for my card kits.  The kits require a lot of cutting and scoring.  I had a commercial heavy-duty thing a few years ago, but you know, half the time the scores did not come out right. Very frustrating to spend $120.00 on something and it never worked right.  I have had as many scoring tools as cutters! 

I cut my sheet 8x9 and center scored


I pulled from my stash a pad I recently purchased- Bright pretty colors


Cut the background paper 3.5"x8.5"
The offcut will be paper for a bookmark


Printed my Digital sheet
I was not paying attention to the printing preview and did not adust sizing so the first batch came out very large.  You can see the corrected version next to it.  I will use the "giant print" size for cards going to nursing home residents.


These cards took no more than 10 minutes to make altogether! 
Thanks for spending a few minutes here with me, 
I hope you have a great day and here is a freebie for you!

Ginny M 


Thursday, July 30, 2020

How to Not Get Caught up in Craft Spending AKA Good Stewardship and Freebie


Hello Everyone, I thought this was worth the time to listen too, Tips on how to avoid creative burn out, and how not get caught up in spending instead of creating - AKA good Stewardship!

One of the reasons I post so many items for you on my blog is to help you build a collection of art and sentiments that you can use for your card making and card ministries without cost.
It is so easy to get caught up in the marketing of "Stuff". This is one of the reasons I never designed for big companies -(I may not have been talented enough) It is so easy to get caught up in our hobbies, buying the latest and greatest. I loved working for the smaller companies and helping them grow their businesses, but even that chapter has changed and I just want to give what has been freely given to me.


I hope you enjoy this video and find it helpful - Linday is a wonderful person and artist and since I know her personally I can attest to her excellent ethics!
you can follow her here: The Frugal Crafter

Thanks for stopping by and here is a freebie for you,  I love this printed on Kraft 


Ginny M

Wednesday, July 29, 2020

Work Art Wednesday ,More Butterflies, Stickles and Mail-Able Dimension


Happy Word Art Wednesday everyone! Karen Letchworth has given us a beautiful devotion!  We also have another gorgeous  Bible Verse digitized by Karen Murray!    Check out the blog to see our Sponsors for this week!      I hope you stop over to the blog and join in the fun


My Card today is made with to digital files from my stash


I printed these on watercolor paper along with this weeks verse and then printed a separate pair to create the pop-up wings


On the pop-up pair, I added a little sparkly Stickles.  I could have used a glitter glue or sparkly pen, but those embellishments are water-based and would have caused the inks to run from my print.


I am thankful for this verse and the long-suffering of The Lord, this long-suffering allowed me and then my children to enter into his kingdom, I never pray come now, Lord.  I pray for him to make me able to stand and work in the days he has given me.

here are some lovely butterflies for you to add to your stash!


Thanks for stopping by, I hope to see your entry in the Word Art Wednesday Challenge

Ginny M


Monday, July 27, 2020

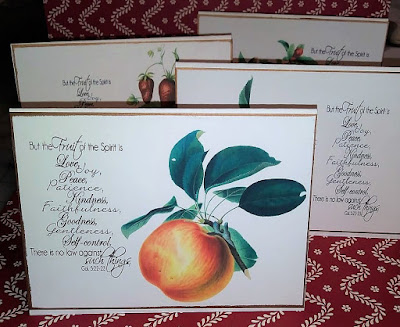
CAS Card Set Freebies for You, Featuring the Fruit of the Spirit

I have some beautiful vintage fruit images and I thought to make a CAS set featuring
Galatians 5:22 the Fruit of the spirit. 

I want to share them with you for your card making and blessing others.
My cards are the a6 size which is 6.25x4.  A slightly larger size which I prefer.
if you are interested I purchase my card stock from The Papermill Store (no Affiliation). I buy only a few papers. One of my favorites is CLASSIC CREST Solar White Card Stock - 18 x 12 in 110 lb Cover Smooth Digital 125 per Package.  Cut in quarters this will make 500 card bases for about 90.00


Here is a peek at all four cards.  I edged each panel with Copper Sharpie and 
adhered to the card base.  Super simple.


You can right-click and save these to your files to make your own set:


I hope you can use these for your card making, Thank you for stopping by and have a great day! 

Saturday, July 25, 2020

How to Use Stash Up For Fun Tag Cards and a Freebie

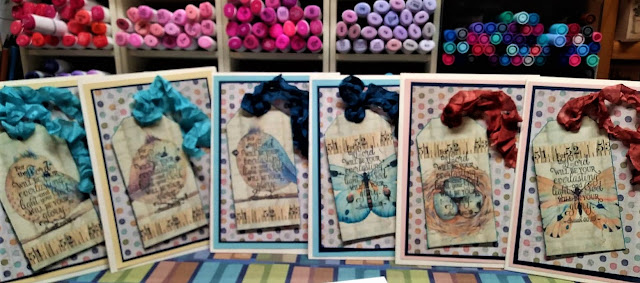
Hi everyone, I hope you are all healthy and staying safe.  The weather has been great here in Central New York and busy as ever.  As the "card Lady" for my church, I am always looking for ideas to make cards of encouragement that are unique and cheerful.  I came across a sheet of tags that I had printed some time ago ad though I would look for a fun print in my paper stash.  I will show you the cards and then the process, read along, or go right to the freebie for your card making!


Well, how is that for focus!


I traced my tag on to a piece of paper to make sure I lined it up properly.  I only had 6 tags and didn't want to stamp on crocked.  

Using a stamp positioner I lined it up


 I also edged each tag


I love using Hug Snug Hem facing for ribbons, they come in a huge selection of colors and are very affordable.  The knots tie easily and will lay very flat for mailing.  here I took snips of the ribbon and gave it a spritz of water and then crunched it up.  once it dries it will stay that way and really looks nice

I make my own glue dots with Aileen's tack it over and over, I used these to hold the tag and ribbon in place

I found some pretty dotted paper and coordinated layers.  
The tags can be take off and used a boo make or in a journal. 
Next time I do this I will heat emboss the scripture stamp.


These were fun to make and I hope fun to receive!

For your card making and maybe my next project!


Thank you for stopping by and Enjoy your weekend!
Ginny M


Wednesday, July 15, 2020

Word Art Wednesday Butterflies and Nail Polish and Freebies


Happy Word Art Wednesday challenge # 448-449 everyone! Karen Letchworth has given us a beautiful devotion!  We also have another gorgeous  Bible verse digitized by Karen Murray!    Our Sponsor this week is: CAS-Ual Fridays!    I hope you stop over to the blog and join in the fun!


I love this weeks verse, To think the Lord would even care for us so tenderly?  Is there any other god that speaks this way? That cares this way?  Not one!


Like all my cards I make sure they are mailable or frameable.   In other words, they are very flat. 
I know many card makers have a lot of beautiful embellishments and they are gorgeous, but they aren't mailable without using a box, and that would just be way out of my budget.
In order to compensate I attempt to use color and pattern and good composition.

For this card, I used the old nail polish trick to give sparkle to the butterflies and paper layering for interest 


the paper is from my stash, an old favorite called Latte from DCWV


Today's verse


and my freebie for your card-making:


Thanks for stopping by and don't forget to join in the Word Art Wednesday Anything Goes challenge, you might win!!

Ginny M


Friday, July 10, 2020

How To Watercolor Using Digital Images Or a Paper and Paint Trial

If you are an avid card maker there will be a point in time that you will run out of space for your stamp collection and take a look at using digitals instead of stamps.  I don't think one can replace the other completely.   Part of the process and love of the art is the ongoing hunt for the perfect stamp. Actually, it is an ongoing event of looking for the perfect everything in stamp making.

 Ten years ago I unmounted about 3,000 stamps and created a storage system for them.  I also made copies of each stamp and digitized them for my personal use. 2 years ago I sold most of that rubber collection.  I still have plenty of well-loved and used stamps but I use 80% digital.
28 years ago when I  learned how to use windows 311 and transitioned to the mighty windows 95, I started collecting public domain art and creating a vast catalog of jpgs to use in art and card making.  Today I have an enormous collection of jpgs I use for stamps and cards.  All safely backed up and stored in multiple places. 

Why am I telling you this?  Because you too might be in the same position and want to know how you can turn more of your collection into beautiful card art.

I love my alcohol markers and they are my #1 go-to for coloring.  However,  I want to use watercolors for my digi's too.
As you may know, watercolors do not work on inkjet printed images.  Inkjet ink is waterbased and it will run and turn into a muddy mess.

You can use a black and white laser printer.  The toner works great with watercolors, the toner is heat cured and will not run. So now we get to the point of my post: What is the best paper to use!

 My laser black and white printer is a Samsung M2825dw, under $200 - So what I have is affordable and nothing fancy.  I am telling you this because most of us underuse what we have because we don't know what we have and this can easily lead us lead to believe we need the latest and greatest. We might need it, but not always!

I know my laser printer will not printer  anything heavier than 65# cover weight paper, my quest was to find a decent, affordable paper that I could watercolor on and run through my laser printer in an effort to use my digital images.

 I did a trial of four papers.  Before I type anymore I am going to say for card making, alcohol markers will still be my #1 go-to, But now I have a better idea of what I can and can't do with my laser printer and the watercolor medium in regards to card making.

I am not an expert in the watercolor art medium - I just enjoy playing with paint.


The mediums:

#1  Masters Touch Watercolors  in half pans, these are a Hobby Lobby product and for my needs and skill they work great, I prefer them over similar price range products.  Thes were used in the upper left-hand corner.

#2 Ohuhu Watercolor dual-tip makers - image in the upper right corner.

#3  Twinkling h2o's  For the image in the lower right-hand corner

#4 Ohuhu Watercolor Brush markers for the image in the lower left-hand corner


The Papers:

#1 Recollection Dove white 65# paper  - Michaels 5.99 usually on sale


 #2 kids drawing paper - drugstore purchase 2.99 per pad - this one you will have to cut down to fit in the printer.

#3 Neenah Classic Crest  80# cover - I usually use this for stamping and inkjet work. About $30.00 for a ream of 250


 #4 Walmart Pen gear cardstock 110# index - 5.92 per ream of 150


The Tests:


Paper #1 Recollections

Papers' water absorption:  good, no buckling
Pigment absorption: good
Color mixing:  good
Toner texture: very good, very little texture, no flaking.


Masters' Touch
Paint and water had good absorption, I was able to do some mixing
Color stayed crisp.


Ohuhu Felt tip markers:
Good Color, poor mixing


Twinkling H2O's

Great color and good mixing


Brush Markers

Yuk


#2 Kids Drawing Pad

Papers' water absorption: Good
Pigment absorption: Good
Color mixing: Terrible
Toner texture: Raised

Masters Touch 

Paint immediately absorbed into the paper, no movement, no blending 


Twinkling H2O's
Same as Masters Touch 


This paper was so terrible to use I did not even try the other two mediums which are more difficult to use.   This paper would have been a complete fail except the images came out really great and there was no smudge or flaking to the toner.  


I will use this to print out sentiments and for coloring images to be crayon-colored for Sunday school.


Paper # 3


Neenah Classic Crest  80# cover 

Papers' water absorption:  Good
Pigment absorption: Good
Color mixing: Good
Toner texture:  Fair some chipping and dust


Masters Touch
Color stayed bright and true, some mixing 


  Ohuhu Felt Brush markers
Great color absorption and some mixing


Twinkling H2O's 

Great color absorption and mixed well


Ohuhu Real Brush tip pens
Over all okay, did not mix well at all


#4 Wall-Mart  Card Stock


Papers' water absorption: Fair
Pigment absorption: Fair 
Color mixing: Poor
Toner texture: Poor, flaking and dust


Masters Touch
Color sat on top of paper, look flat and dull. Colors bled into each other.


 Ohuhu Felt tip brush markers
Again flat but the color stayed crisp


Twinkling H2O's
This actually worked well, the paints behaved nicely with this paper.


Ohuhu Real Brush Tip Markers
Like the H2O's this paper worked well 


This trial took my 2 days to put together and I am glad I did, now I have a reference for paper and watercolor use in my laser Printer.

My personal favorites from this are:
My first choice will be the Recollections paper.  
 when using digitals.  
Medium 1st choices are the Master Touch and Twinkling H2O's.
I feel I got the best results and had the most crafty satisfaction using these in combination.

My second choice would be the Neenah Paper using the H2O's and the Ohuhu Felt Brush markers.
This Ohuhu set has 120 colors, with that range I would have a lot of flexibility and they are great to use when not in-home studio.
This Neenah paper is a go-to for inkjet printing and alcohol marker use. Great Stuff!


The kids' paper and the Walmart paper I will use for different things but not for watercolors and I will not purchase again.


I hope you found this helpful, this is the first time I have done something like this on my blog. I found the overall process quite fun and I know it will save me $$, now I know what to buy when I run out of paper.  
Thanks for stopping by and I hope you have a great weekend,
Ginny M  


Scripture Writing Set up for the Week

I have been following a daily scripture writing program for four years now, the more I do this the more I love it! It is one small process t...